Sourdough Bulk Fermentation: Timing, Signs, and How to Nail It
Bulk fermentation is the single most important step in making sourdough bread. Get this right and you can get away with mediocre shaping, mediocre scoring, mediocre everything else -- and still produce excellent bread. Get it wrong and no amount of fancy technique will save you. Here's how to nail it every time.
What bulk fermentation is (and why it matters)
Bulk fermentation is the first rise after you mix all your ingredients. The term "bulk" comes from bakeries where multiple loaves' worth of dough ferments together in one big batch before being divided.
During this phase, three things happen simultaneously. Your yeast produces CO2, inflating the dough. Your bacteria produce lactic and acetic acid, creating flavor and breaking down gluten. And enzymes (protease and amylase) break down proteins and starches, making the dough more extensible and the sugars more available.
The magic of sourdough bread -- the flavor, the texture, the open crumb -- comes from giving these processes enough time to work but stopping before they go too far. Too short and you get bland, dense, gummy bread. Too long and you get a sticky, flat, overly sour pancake. The sweet spot is everything.
How long does bulk fermentation take?
There's no universal answer, and anyone who gives you one is guessing. Bulk fermentation depends on temperature, flour type, starter strength, and how much starter you used.
That said, here's a rough framework. At 22C (72F) with 10% starter (baker's math), expect 8-12 hours. At 25C (77F) with the same amount, expect 5-8 hours. At 30C (86F), you might be done in 3-5 hours.
Do not rely on these numbers. They're ballparks to help you plan your schedule, not targets to hit. Your flour, your starter, and your kitchen are different from mine. The real answer is to watch the dough, not the clock. That's what the next sections are for.
The single most important principle: aim for slow fermentation. Use less starter (5-10% instead of 20%) and let the dough take its time. Slow fermentation means more enzymatic activity, better flavor, more extensible dough, and a bigger window before things go wrong.
Temperature: the invisible variable
Temperature controls fermentation speed more than any other factor. Every degree matters.
At 20C (68F), fermentation crawls. Your dough might need 12+ hours. At 25C (77F), it's moving briskly -- 6-8 hours. At 30C (86F), things get fast and dangerous. The window between "not enough" and "too much" shrinks dramatically.
This is why recipes from other bakers almost never work on the first try. Their kitchen is a different temperature than yours. A recipe written for a 25C kitchen will underferment in your 19C kitchen if you follow the same timing.
For beginners, cooler is better. A slower fermentation gives you a bigger margin of error. If your kitchen runs hot, use less starter (drop to 5% or even 1%) to slow things down. You're aiming for a total bulk fermentation of 8-12 hours -- that seems to be the sweet spot for most flours, giving enzymes enough time to work.
Use room temperature water when mixing your dough. If the water is significantly warmer or cooler than the air, your aliquot jar (covered next) will be unreliable.
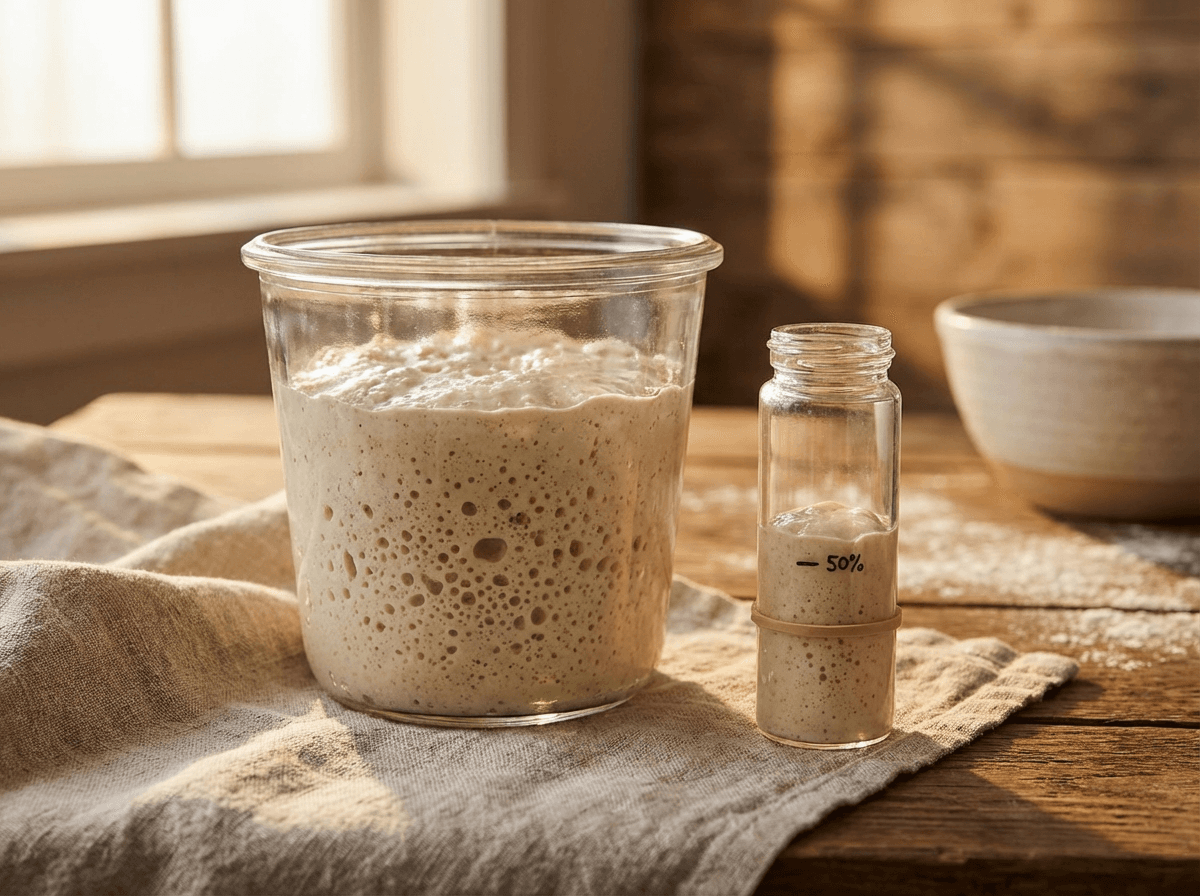
The aliquot jar method
An aliquot jar is the single best tool for managing bulk fermentation. It's a small sample of your dough placed in a clear, cylindrical container so you can literally watch it rise.
After you finish kneading and building initial dough strength, pinch off a small ball of dough and press it into a small jar. Mark the starting height with a rubber band or a line on the jar. Place the jar next to your bulk container so both stay at the same temperature.
As your main dough ferments, so does the aliquot. When the sample has risen by your target percentage, your dough is ready to shape. The beauty of this method is that it works regardless of temperature. Hot kitchen, cold kitchen, summer, winter -- the aliquot adjusts automatically.
How much rise to target depends on your flour's protein content. Start with 25-50% increase for your first few bakes. If that produces bread you're happy with, great. If you want more openness and tang, push to 50-75%. Strong bread flour (13%+ protein) can handle 75-100% increase. Low protein flour might max out at 25-50%.
One critical note: always use room temperature water. If your dough water is warmer than the room, the small aliquot will cool down faster than the main dough, making the reading lag behind. Cooler water causes the opposite problem.
Stretch and folds during bulk
Stretch and folds add dough strength during bulk fermentation. You stretch one side of the dough upward and fold it over itself, then rotate and repeat. Four folds (one from each direction) count as one set.
Here's the technique: wet your hands with cold water. Gently loosen the dough from the container edges by sliding your hand down the side. Grab one edge, stretch it upward as far as it'll go without tearing, and fold it to the center. Rotate 90 degrees and repeat three more times. The whole thing takes about 30 seconds.
How many sets do you need? For most doughs, one or two sets in the first few hours is plenty. If your dough is high hydration (75%+) and spreading flat in the container, you might need 3-4 sets spaced 30-45 minutes apart.
Stretch and folds also redistribute heat, gas, and acidity throughout the dough. This evens out fermentation and produces a more consistent crumb. If you're getting giant random holes ("fool's crumb") in your bread, more stretch and folds can help.
Don't overdo it. If the dough is already holding its shape well, additional folds are wasted effort. And if the outer gluten layer tears during a fold, stop -- let the dough rest for 10 minutes to heal before trying again.
Signs your bulk fermentation is done
Beyond the aliquot jar, learn to read the dough itself. These signs improve with experience, but here's what to look for:
Bubbles on the surface. Small bubbles scattered across the top of the dough are a sign of active gas production. The more bubbles, the further along the fermentation. If you push too far, the bubbles disappear as the gluten breaks down and can't trap gas anymore.
Dough feels puffy and jiggly. Pick up the container and give it a gentle shake. The dough should wobble like gelatin. Early in fermentation it moves sluggishly; at the right point it's light and responsive.
Smell. Your dough should smell like a ripe starter -- pleasantly sour, tangy. If it smells like a vinegar factory, you've gone too long.
Stickiness. As fermentation progresses, the dough becomes slightly less sticky than it was at the start (assuming you developed good gluten). If it suddenly becomes very sticky again, you've over-fermented.
When in doubt, stop the bulk a little early rather than a little late. Slightly underfermented bread is dense but edible. Overfermented dough becomes a flat, sticky disaster that can only be saved by a loaf pan.