This is the bread that starts conversations. The one with the crackly crust, the open crumb, and the tang that store-bought bread can't touch. Making it takes time (plan on 12-24 hours total, with about 30 minutes of actual work), but the process is simpler than most recipes make it seem.
The hardest part isn't any single step. It's learning to read your dough -- knowing when fermentation is done, when the gluten has developed enough, when the proof is just right. This guide will teach you what to look for so you're not just following a timer.
For one loaf:
- 400g bread flour (higher protein handles sourdough's long fermentation better) - 100g whole wheat flour (boosts enzymatic activity and flavor) - 300-375g water at room temperature (60-75% hydration -- start at 65% if you're new) - 50g active sourdough starter (10% of flour weight) - 10g fine sea salt (2% of flour weight)
That's it. Flour, water, starter, salt.
If you don't have whole wheat, use all bread flour. If you only have all-purpose, it'll work -- you'll just need to use less water (start at 60% hydration) because AP flour has less protein and absorbs less water.
To scale up, use baker's percentages. All the numbers above are calculated from the total flour weight (500g = 100%). Want two loaves? Double everything. Want four? Quadruple it. Baker's math makes this effortless.
Actual requirements: a mixing bowl, a kitchen scale, a vessel to bake in (Dutch oven is ideal), a razor blade or sharp knife for scoring, and something to proof in (banneton basket, or a bowl lined with a floured kitchen towel).
Nice to have: a bench scraper (makes handling dough much easier), a digital thermometer (for water temperature), an aliquot jar (for tracking fermentation -- highly recommended).
You don't need: a stand mixer (hand mixing works fine), a bread lame (a razor blade on a coffee stirrer works), a proofing box (your oven with just the light on works), or any special gadgets.
The Dutch oven is the closest thing to a requirement. It traps steam from the dough during baking, which is essential for oven spring and crust formation. A heavy pot with a lid -- cast iron, enameled cast iron, even a clay pot -- does the job. If you don't have one, you can bake on a sheet pan with a pan of boiling water below it, but the results won't be as good.
Before you do anything else, make sure your starter is active and healthy. Feed it 4-8 hours before you plan to mix your dough. You want it at or near peak activity when it goes into the dough.
Signs of readiness: it's risen since its last feeding, there are bubbles throughout (not just on top), and it smells pleasantly tangy -- like yogurt or mild vinegar, not like nail polish remover.
If your starter hasn't been fed in a while (fridge storage), give it two feedings before bake day. The first feeding wakes it up; the second gets it into good shape. Feed at a 1:5:5 ratio (1 part starter, 5 parts flour, 5 parts water).
This step matters more than any other. A sluggish starter means sluggish fermentation, which means dense, underfermented bread. Get this right and everything downstream gets easier.
Add your flour, water, and starter to a large bowl. Mix until no dry flour remains. Don't worry about technique here -- you're just hydrating the flour and distributing the starter evenly.
Wait 15-30 minutes. This short rest lets the flour absorb the water and starts the enzymatic reactions (amylase breaking starches into sugars, protease loosening protein bonds). Your dough will feel noticeably different after just 15 minutes -- smoother, more cohesive, less shaggy.
Add the salt and mix it in thoroughly. Some recipes say to add salt later, but in practice, adding it now makes no measurable difference and saves you a step. Squeeze and fold the dough a few times to make sure the salt is evenly distributed.
This is the fermentolysis approach -- mixing everything at once and using a smaller amount of starter (10% instead of the 20% many recipes call for). You skip the autolyse step entirely because the longer fermentation achieves the same enzymatic benefits without the hassle of mixing your dough twice.
Now you need to develop gluten. You have options.
By hand: slap and fold the dough on an unfloured counter for 5-10 minutes. Pick it up with both hands, stretch it upward, slap the bottom half onto the counter, and fold the top over. Repeat. The dough will go from shaggy and sticky to smooth and elastic.
Alternatively: knead for 3-5 minutes, then wait 15 minutes, then knead another 2-3 minutes. The waiting does a surprising amount of work -- gluten bonds form automatically when flour is hydrated. Kneading aligns them; resting lets them set.
With a stand mixer: mix on low for 2 minutes to incorporate, rest 10 minutes, then mix on medium for 5-7 minutes. The dough should pull cleanly from the sides of the bowl when the gluten is developed.
The goal is a smooth, cohesive dough that you can stretch thin without tearing (the windowpane test). Once you're there, shape the dough into a smooth ball by dragging it across the unfloured counter surface, tucking the edges under. This creates surface tension.
Pull off a small piece of dough and put it in a small, clear container. Mark the level. This is your aliquot jar -- your best friend for tracking fermentation.
Place your dough in a lightly oiled container, cover it, and wait. This is bulk fermentation -- the period where the magic happens. Yeast produce CO2. Bacteria produce organic acids. Enzymes break down starches and proteins. Your bread develops flavor, texture, and rise.
At room temperature (21-24C / 70-75F), bulk fermentation takes roughly 8-12 hours with 10% starter. In a warm kitchen (25C+ / 77F+), it's faster -- maybe 5-8 hours. In a cool one (18-20C / 64-68F), it could take 12-16 hours.
Do not rely on time. Rely on your dough.
Watch your aliquot jar. You're aiming for a size increase of 25-75%, depending on your flour's protein content. High-protein bread flour (12%+ protein) can handle more rise. All-purpose flour (10-11% protein) should stop earlier. Start at 50% size increase for your first bake and adjust from there.
Watch the dough itself. It should look puffier, have bubbles visible on the surface and sides, and feel airier when you tilt the container. It should smell mildly tangy -- like sourdough, not like paint thinner.
During the first half of bulk fermentation, do 1-3 sets of stretch and folds, spaced 30-60 minutes apart. Each set: wet your hands, stretch one side of the dough up and fold it to the center, rotate 90 degrees, repeat on all four sides. This adds strength and redistributes heat and fermentation activity. After your folds are done, leave the dough alone for the remaining hours.
Once bulk fermentation is done, flour your counter and gently turn the dough out. If you're making one loaf, this step is optional but helpful. If you're making multiple loaves from a larger batch, it's essential.
Use a bench scraper to ease the dough out of the container. Try to be gentle -- you want to keep as much gas inside as possible. Lightly flour the top of the dough.
Drag the dough across the unfloured part of the counter to create surface tension. Use the bench scraper or your hands to pull it toward you while the counter friction tightens the bottom. The top should become smooth and taut. Don't use flour underneath during this step -- friction is what creates surface tension.
If the dough tears, you've gone too far. Let it rest 10 minutes and try a gentler round.
Once you have a roughly round shape with a smooth top, let it sit uncovered for 15-20 minutes. Don't cover it -- you want the surface to dry slightly, which makes final shaping much easier. This rest also lets the tightened gluten relax so you can shape without the dough fighting you.
Flour the top of your pre-shaped dough. Flip it over with your bench scraper or hands so the floured side is down and the sticky side faces up.
For a batard (oval): gently stretch the dough into a rough rectangle. Fold the side closest to you up to the middle and press gently. Fold the far side over the top of that fold, stretching it slightly toward you. Now roll the dough inward from the top, creating a tight log. Seal the seam by pinching gently. Optionally, pinch the ends closed for a neater shape.
For a boule (round): fold the edges of the dough toward the center -- top, bottom, left, right -- pressing each fold gently to seal. Flip the dough over (smooth side up), and drag it across the counter to tighten the surface. The seam side should be underneath.
Flour the top of your shaped dough generously. Place it in a floured banneton, top-side down (the seam side faces up in the banneton). This way, when you flip the banneton onto your baking surface, the smooth, scored side is on top.
Cover the banneton with a kitchen towel or plastic wrap.
You have two options, and the right one depends on your schedule.
Room temperature proofing (1-3 hours): leave the shaped dough at room temperature. Check it every 15-30 minutes with the finger poke test. Flour your finger, press about 1cm into the dough. If the indent springs back quickly -- not ready, keep waiting. If it springs back slowly and a slight indent remains after one minute -- ready to bake. If it doesn't spring back at all -- overproofed, but still bakeable (the bread will just be flatter).
Cold retard (8-24 hours): put the banneton directly in the fridge. The cold slows fermentation to a near-stop, letting you bake whenever it's convenient the next day. This is the choice for evening bakers who want fresh bread in the morning. Cold dough also scores much more cleanly.
For your first bake, cold retarding is more forgiving. It gives you a wider window before the dough overproofs, and the cold dough is easier to handle. Put it in the fridge after shaping, go to sleep, and bake in the morning.
When in doubt, err on the side of slightly underproofed. You can always push it further next time, but you can't un-overproof a dough.
Preheat your oven to 230C (450F) with your Dutch oven inside for at least 30-45 minutes. You want that pot screaming hot.
Turn your dough out of the banneton onto parchment paper or directly onto your counter. The smooth, floured surface should now be facing up.
Using a razor blade or lame, make a single, confident cut along the length of the loaf at about a 45-degree angle to the surface. Go about 1-1.5cm deep. This is the functional score -- it gives the bread a controlled place to expand during oven spring. Without it, the bread cracks open wherever it pleases, usually at the seam.
The angle matters. A shallow angle (close to parallel with the surface) creates an ear -- that thin, crispy flap of crust that lifts during baking. A perpendicular cut creates more of a split. Both work; the ear is mostly aesthetic.
Be decisive. One smooth, confident slash is better than a hesitant, sawing motion. If the blade drags and tears the dough, either the blade is dull, the dough surface isn't dry enough, or the dough is too warm. Cold-retarded dough scores like a dream.
Decorative scoring (wheat stalks, spirals, leaf patterns) is optional and doesn't affect the bread. If you want to try it, practice on dough scraps after kneading, when mistakes don't matter.
Sourdough baking happens in two distinct phases.
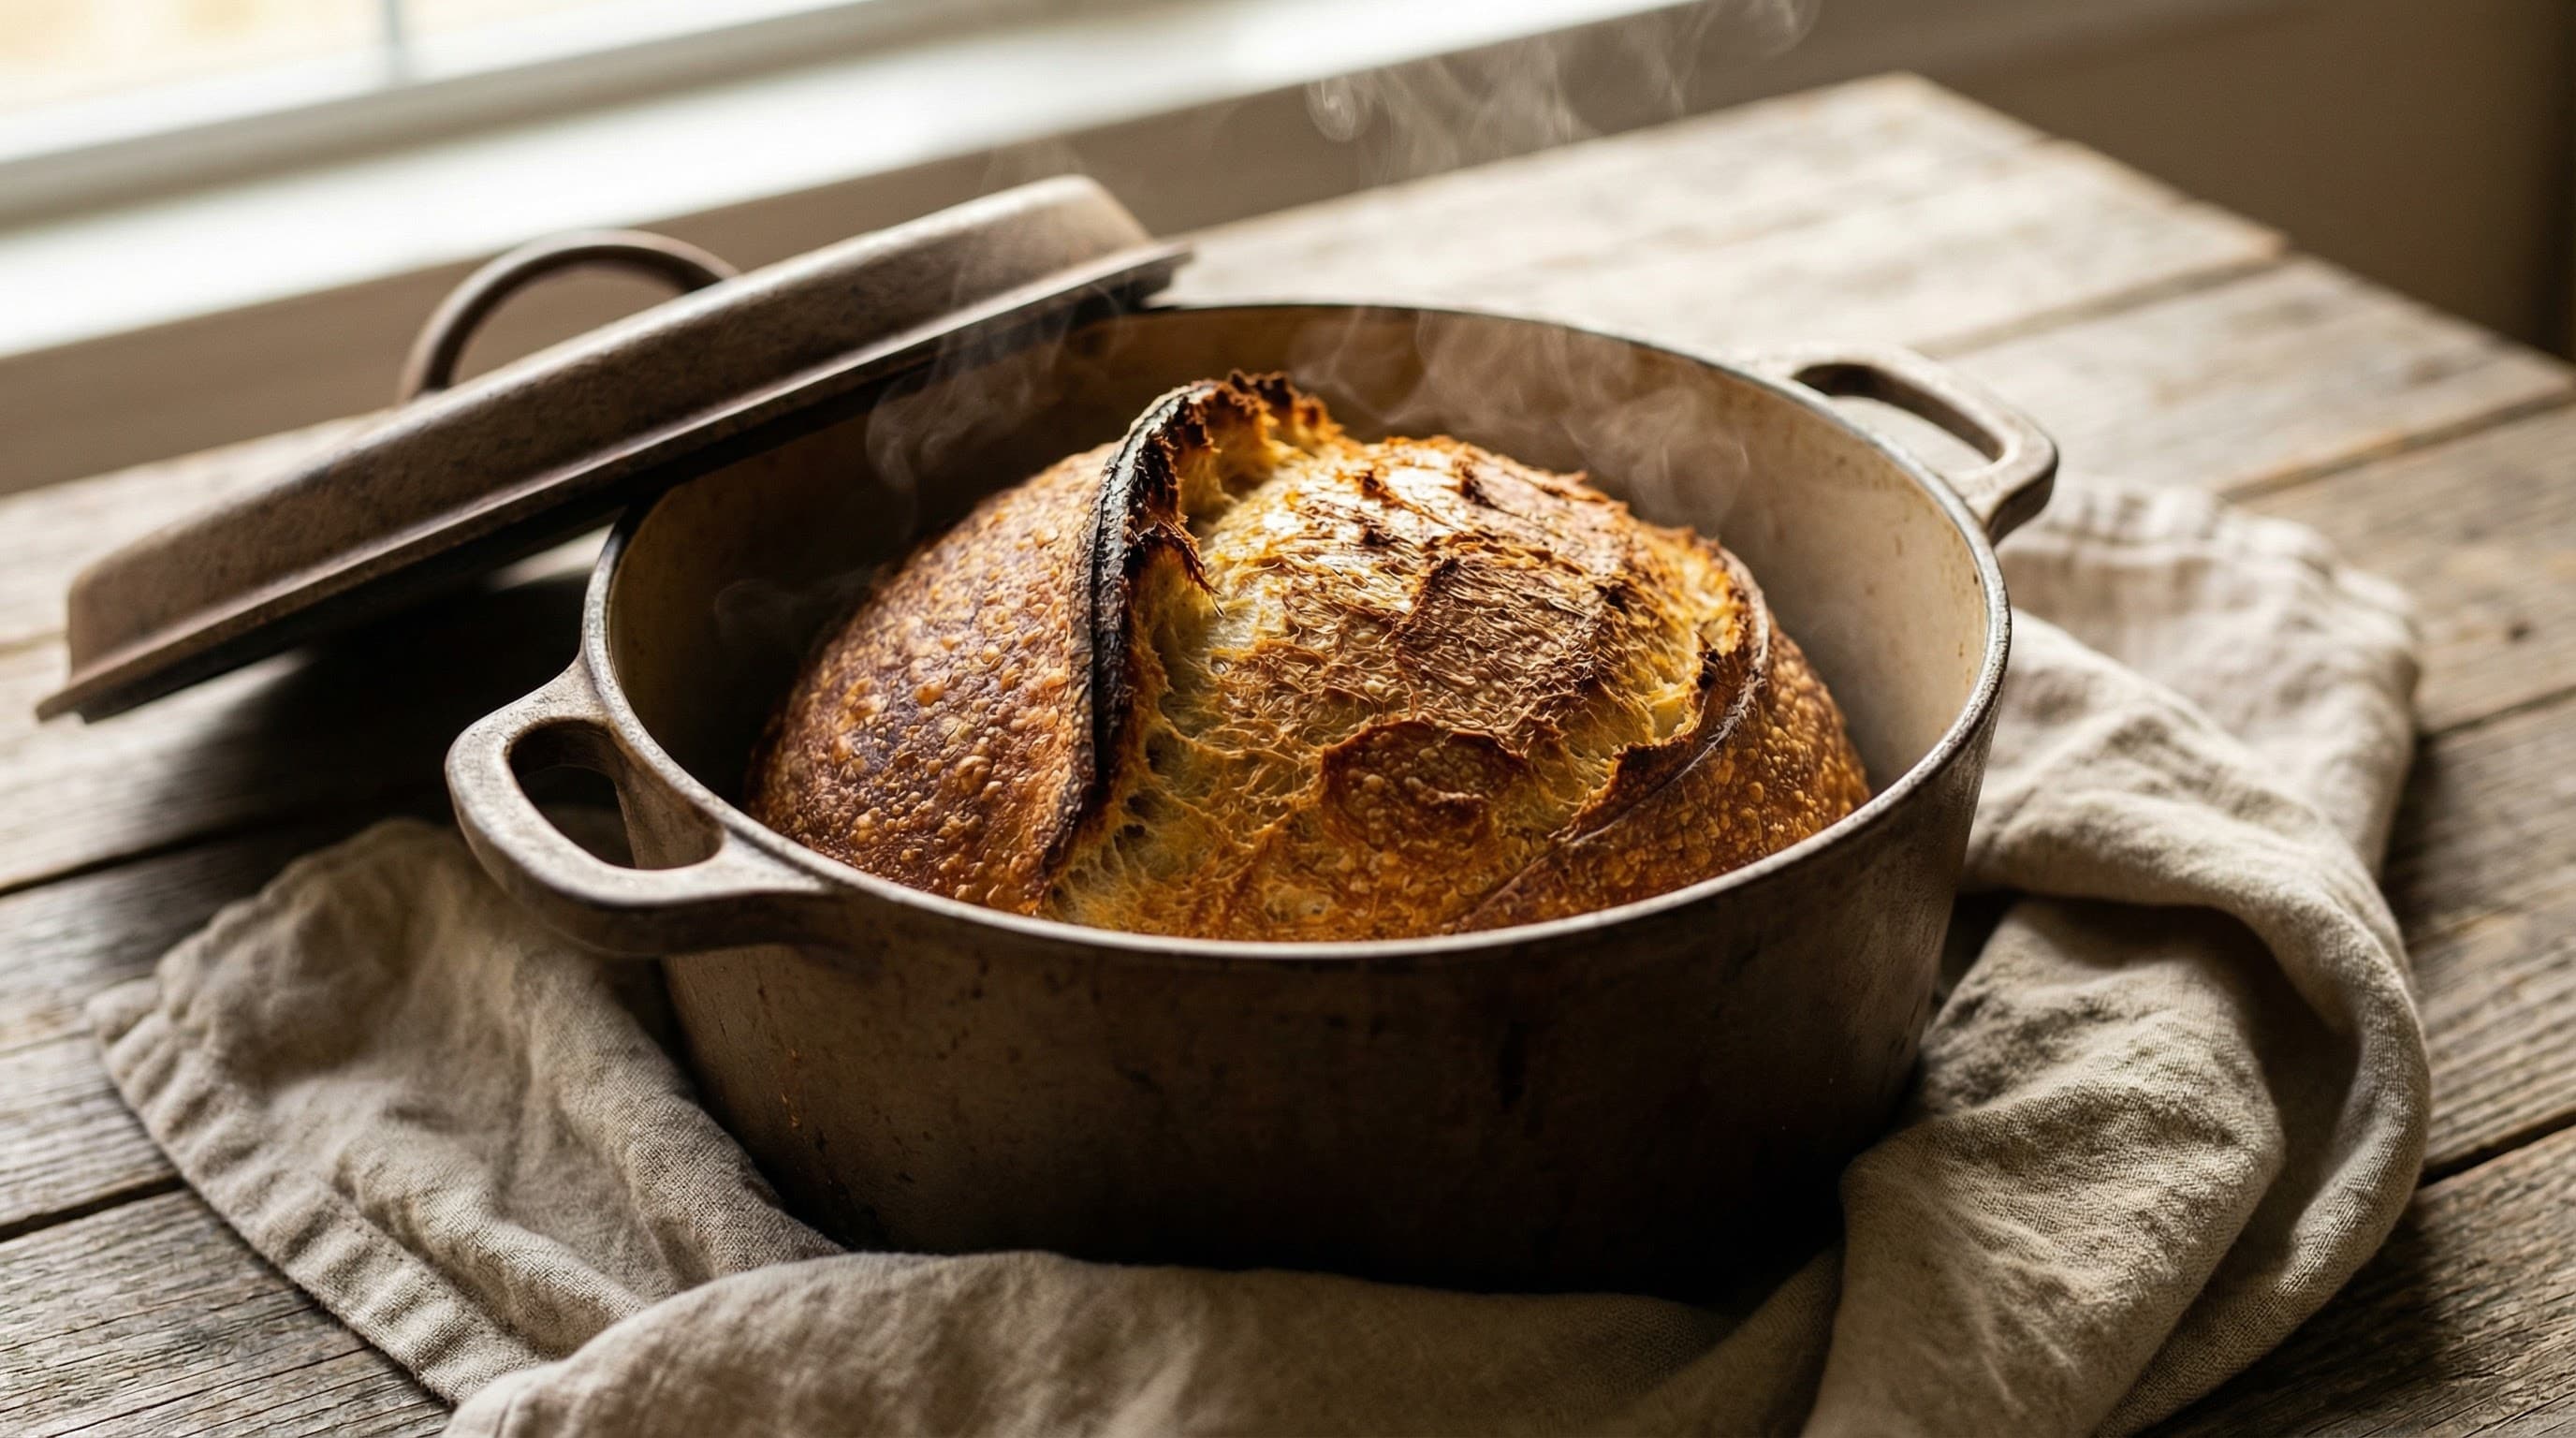
Phase 1 -- with steam (20-25 minutes, lid on): carefully lower your scored dough into the screaming-hot Dutch oven. Put the lid on. The sealed environment traps moisture released from the dough, creating steam that keeps the crust flexible while the bread undergoes oven spring. During these first minutes, the yeast have a final burst of activity before dying off around 60C (140F), the trapped gases expand, and the bread rises dramatically at the score line.
Phase 2 -- without steam (20-25 minutes, lid off): remove the Dutch oven lid. The bread is now fully risen and needs to develop its crust. The exposed surface dries out, the Maillard reaction kicks in, and the crust darkens and crisps. Bake until the crust is deeply browned -- darker than you think. A pale crust lacks flavor. You want mahogany, not beige.
Total bake time is typically 40-50 minutes. Use your eyes, not just a timer. The bread is done when it looks deeply browned, sounds hollow when tapped on the bottom, and the crust feels hard and craggy.
Carefully remove the bread from the Dutch oven and place it on a wire rack.
Do not cut into your bread for at least one hour. Two hours is better. Yes, this is painful. The bread is right there, crackling and steaming and smelling incredible. But the crumb is still setting.
Here's what's happening inside: residual heat is evaporating excess moisture, starches are retrograding (firming up), and the crumb structure is solidifying. If you cut too early, steam escapes before the structure has set, leaving you with a gummy, compressed center. This is one of the most common reasons for a gummy crumb -- and the fix costs nothing but patience.
Listen to your bread while it cools. You'll hear it crackling and singing as the crust contracts and tiny fissures form. That sound means the crust is thin, crispy, and well-developed. It's one of the most satisfying sounds in baking.
Once it's cooled, slice in. Look at what you made. Then start planning what you'll do differently next time.